An Arduino is basically a small computer. It can take input about the outside world, do calculations and send out put signals. The Arduino uses its own Arduino language. The Arduino language is very similar to C, but is more abstracted with slightly modified rules that pertain to the Arduino language. Still, if I were trying to seriously introduce someone to programming, I would definitely not recommend starting with the Arduino programming language by themselves.
In addition to the Arduino Micro controller, We also used a breadboard.
What is a bread board?
This is a breadboard.
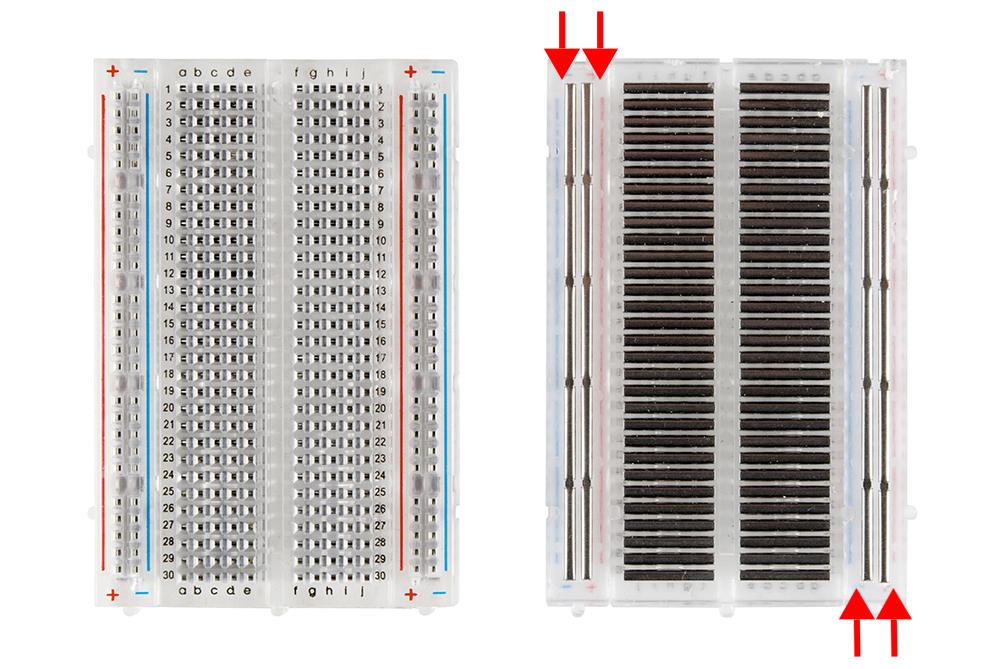
A breadboard is an easy way to make connections between two wires without the need for soldering, tape, alligator clips or any other way to connect wires together. All of the connection points on the side in the + or - column are connected to in a column, and each of the rows are connected, as youc an see in the right part of the diagram. a breadboard makes making wire connections much more convenient and reversible.
It is the B&B (bread and butter) of the casual EE(Electrical engineer).
The first task:
The firs task was to figure out why and how this piece of code works
Blink with delay of 10 – explain why the LED is on continuouslyCode:
// // the setup function runs once when you press reset or power the boardvoid setup() {
// initialize digital pin 13 as an output.
pinMode(13, OUTPUT);
}
// the loop function runs over and over again forever
void loop() {
// visible blinking
// digitalWrite(13, HIGH); // turn the LED on (HIGH is the voltage level)
// delay(1000); // wait for a second,
// digitalWrite(13, LOW); // turn the LED off by making the voltage LOW
// delay(1000); // wait for a second
// fast blinking
// digitalWrite(13, HIGH); // turn the LED on (HIGH is the voltage level)
// delay(500); // wait for half second
// digitalWrite(13, LOW); // turn the LED off by making the voltage LOW
// delay(500); // wait for half a second
// blinking so fast you can't see it
digitalWrite(13, HIGH); // turn the LED on (HIGH is the voltage level)
delay(10); // wait for a 10 milliseconds
digitalWrite(13, LOW); // turn the LED off by making the voltage LOW
delay(10); // wait for 10 milliseconds
}
the LED flashes every 10 milliseconds, but this is so fast that our eyes perceive it as a continuous light.
the second task was to produce a pattern with (at least) 3 LEDs of different colors using the delay() function
// the setup function runs once when you press reset or power the board
void setup() {
// initialize digital pin 13 as an output.
pinMode(13, OUTPUT);
pinMode(12, OUTPUT);
pinMode(11, OUTPUT);
}
// the loop function runs over and over again forever
void loop() {
digitalWrite(13, HIGH); // turn the LED on (HIGH is the voltage level)
delay(500); // wait for a second
digitalWrite(13, LOW); // turn the LED off by making the voltage LOW
delay(500); // wait for a second
digitalWrite(12, HIGH); // turn the LED on (HIGH is the voltage level)
delay(500); // wait for a second
digitalWrite(12, LOW); // turn the LED off by making the voltage LOW
delay(500); // wait for a second
digitalWrite(11, HIGH); // turn the LED on (HIGH is the voltage level)
delay(50); // wait for a second
digitalWrite(11, LOW); // turn the LED off by making the voltage LOW
delay(50); // wait for a second
}– the third task was to use a potentiometer to change the blink speed of the LED behavior proportional to the resistance measured by the potentiometer:
This is the setup:


This is the code
//const int Pin_Pot = A0; // I have a fixed integer named Pin_Pot whose assigned value is A0const int Pin_LED = 13; // fixed integer value that select output pin aka select LED
int Pot_Value; // I have an integer named Pot_Value
void setup() {
// put your setup code here, to run once:
// pin mode configures the specified pin, Pin_LED to be input or output (in our case, output)
pinMode(Pin_LED, OUTPUT); // sets up Pin_LED as an output
}
void loop() {
// put your main code here, to run repeatedly:
// analogRead reads the voltage from the specified pin (Pin_Pot) as an integer from
// 0 to 1023 which is saved as an interger in Pot_value
Pot_Value = analogRead(Pin_Pot); // set wait time from the output of the potentiometer which went into Pin_Pot
digitalWrite(Pin_LED, HIGH); // LED is on
delay(Pot_Value); // wait the wait time, which is Pot_Value
digitalWrite(Pin_LED, LOW); // LED is off
delay(Pot_Value); // wait the wait time, which is Pot_Value
}
//the fourth task was to create a pattern with (at least) 3 LEDs of different colors that does not use the delay() function
this is the code
//const int Pin_Pot = A0; // I have a fixed integer named Pin_Pot whose assigned value is A0const int Pin_LED2 = 12; // fixed integer value that select output pin aka select LED
const int Pin_LED1 = 11;
const int Pin_LED3 = 13;
long lastTime = 0; // Sets lastTime to 0
int led_Value = HIGH; // Sets led_Value to HIGH
int Pot_Value; // We have an integer named Pot_Value
void setup() {
// put your setup code here, to run once:
pinMode(Pin_LED1, OUTPUT); // sets up Pin_LED1 as an output
pinMode(Pin_LED2, OUTPUT); // sets up Pin_LED2 as an output
pinMode(Pin_LED3, OUTPUT); // sets up Pin_LED3 as an output
}
void loop() {
// put your main code here, to run repeatedly:
Pot_Value = analogRead(Pin_Pot); //set wait time from the output of the potentiometer
if(millis() > lastTime + Pot_Value){
//if number of milliseconds is greater than number of milliseconds of the last loop through plus the
// Pot_Value, continue
if(led_Value == HIGH){ // if Led_Value is HIGH
led_Value = LOW; // then set Led Value to be LOW
}
else{ // if led_Value is LOW
led_Value = HIGH; // then set Led_Value to be HIGH
}
lastTime = millis(); // sets lastTime to be number of Milliseconds since beginning of program.
digitalWrite(Pin_LED1, led_Value); // turn the Led that is Pin_LED to whatever value led_Value is.
digitalWrite(Pin_LED2, led_Value); // turn the Led that is Pin_LED to whatever value led_Value is.
digitalWrite(Pin_LED3, led_Value); // turn the Led that is Pin_LED to whatever value led_Value is.
}
}//This is a picture of the final set up that was capable of doing all of these things.

No comments:
Post a Comment