So I had my test pieces printed out and tested!
Spoilers: it worked.
Before I assess my mechanical toggle, I must mention that saving the Solidworks files into drawings and cutting them out wasn't as easy and straightforward as I expected. For One I had to remember to extrude the part become I could save part as a drawing. Additionally, when I saved it, I had to make sure that the drawing was projected frontally in a 1:1 proportion. I also wanted to make sure that the drawing dimensions fitted the dimensions of the piece. Also when I saved the drawing, I had to make sure to save it in .DXF format rather than the default Solidworks. Then I had to transfer ti to the special corel draw software, make sure sure that the dimensions of the drawing of my part matched exactly the dimensions that I had in my solidworks part, and I had to make sure that the size of the document fitted tightly around the part so as not to waste empty space on the actual physical delrin bard later. I did everything in solidworks in centimeters (like a good scientist), but corel draw was all in inches (like an American designer), which wasn't really a problem at all, but I'm mentioning it anyways. Then I had to make sure that all of the lines were hairline lines and were red. Then I had to print it, setting printer(read laser cutter) preferences to have the small document size that closely encased the part. Then I had to find the print(read: cut) job in the lasertroc program, and position it. the other steps of the laser printing process, I think I described earlier, and so I will not repeat myself.
Well, I got everything printed, and the first iteration almost worked.
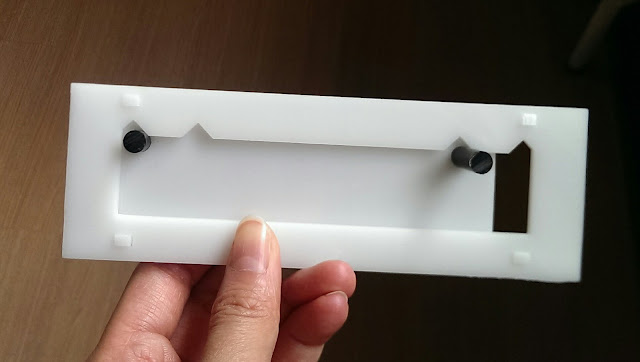
The biggest problem was that the toggle was too large for the frame and couldn't move high enough without hitting the internal spacers to allow the dowels to clear the dips.
In the picture below, I'm holding this up and you can clearly see that the dowels don't clear the dips enough for the toggle to move.
Additionally the hole in the toggle gave the dowels a loose fit.
Also I figured, that I could cut the width of the toggle, because the dowel hole could afford to be closer to the edge, and because I wanted a slightly greater gap in between the toggle and the edge of the window frame in order to better see the color that will eventually be colored in the area in between
a quick redesign was called for, for decreasing the height and for tightening the dowel holes of the toggle.
The second iteration is seen above, and the first iteration is seen below
also I re-learned how to use a band saw again. Honestly I don't mind band saws. They're not as scary as saber saws.
After the redesign of the toggle, everything else was okay. The second produced iteration of the toggle fit well with the original iteration of front back and spacer. The pieces were assembled rather easily and were tight enough that nothing fell apart.
Another small complaint is that I may have left too much room in between the back and the front for the toggle. I left that space available because I want it to accommodate the protrusion of the dowel heat staked to the toggle. I will try to heat stake it and see how much of the empty space, I actually need.
Another small complaint is that the delrin tends to warp and peel away from each other. I think a third connection point between the spacer and the front and back would ameliorate this situation.
overall, I 'm pretty satisfied with this second iteration. everything works. Now its down to some small tweaks until I'm mostly satisfied.
Here I have a picture of the toggle going from comfortably being on the right to being comfortably on the left.
another small modification:
it is a pretty good press fit, but I feel like it could be better.
now it was back to the solidworks models to make my modification son the second iteration.


I really like this model and have tried it in lab myself. It is really cool!
ReplyDeleteyour design is really cool!
ReplyDeleteI really like how sleek and aesthetically pleasing your model is – it looks really cool!
ReplyDeleteCool design for the toggle! Glad you were able to get the system to work!
ReplyDeletewow! your Solidworks modeling looks so complicated!
ReplyDelete