So, if looking at just time spent running isn't accurate, what is? Maybe if the motor could encode what distance it traveled, then we could know judge 10 feet by the distance both motors traveled?
The good news is that Sciborgs and Arduino already have this functionality. The sciborgs motors encode what angular distance they have traveled.
• MotorEncoder
//code for MotorEncoding // Include the Bricktronics Motor library and helper libraries#include <Encoder.h>
#include <PID_v1.h>
#include <BricktronicsMotor.h>
// Select the motor port (MOTOR_1 or MOTOR_2) in the constructor below.
//
#include <Wire.h>
#include <Adafruit_MCP23017.h>
#include <BricktronicsShield.h>
BricktronicsMotor m1(BricktronicsShield::MOTOR_1);
unsigned long previousMillis = 0; // will store last time motor reversed direction
int rpms = 225; //speed of motor (range is 0-225)
void setup()
{
// Be sure to set your serial console to 115200 baud
Serial.begin(115200);
BricktronicsShield::begin();
// Initialize the motor connections
m1.begin();
}
void loop()
{
// create a variable called motor1 which will be used to record the motor encoder position
int32_t motor1;
//reverse the motor direction every second; print the encoder value at the point of reversal.
if(millis() > previousMillis + 1000){
rpms = -1*rpms; //reverse motor direction by multiplying its value by -1
m1.setFixedDrive(rpms);
previousMillis = millis();
motor1 = m1.getPosition();
Serial.print("motor 1 position - ");
Serial.println(motor1);
}
}
//Interestingly enough, we found that every time that the motor switched from going forward to going backward that it would travel a little more forward than backward. 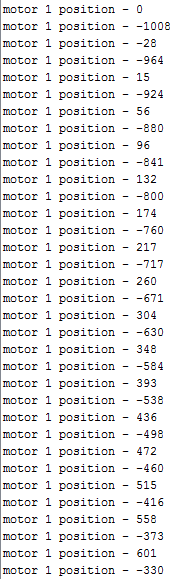
Perhaps the motor does not instantaneously switch form full speed forward to full speed backwards and a bias towards going forward causes a gradual net forward motion? Or it could be that the motor faces more friction in one direction than in the other?
//code for running a sciborg 10 feet using Motor Encoder Values// Include the Bricktronics Motor library and helper libraries
#include <Encoder.h>
#include <PID_v1.h>
#include <BricktronicsMotor.h>
// Select the motor port (MOTOR_1 or MOTOR_2) in the constructor below.
//
#include <Wire.h>
#include <Adafruit_MCP23017.h>
#include <BricktronicsShield.h>
BricktronicsMotor m1(BricktronicsShield::MOTOR_1);
BricktronicsMotor m2(BricktronicsShield::MOTOR_2);
unsigned long previousMillis = 0; // will store last time motor reversed direction
int rpms1 = 255; //speed of motor (range is 0-225)
int rpms2 = 255;
int32_t motor1;
int32_t motor2;
void setup()
{
// Be sure to set your serial console to 115200 baud
Serial.begin(115200);
BricktronicsShield::begin();
// Initialize the motor connections
m1.begin();
m2.begin();
}
void loop()
{
while (motor1 > 16000){
rpms1 = 0;
rpms2 = 0;
m1.setFixedDrive(rpms1);
m2.setFixedDrive(rpms2);
}
motor1 = m1.getPosition();
motor2 = m1.getPosition();
// Serial.print("motor 1 position - ");
// Serial.println(motor1);
m1.setFixedDrive(rpms1);
m2.setFixedDrive(rpms2);
}
//
Another method of stopping the sciborg is to stop it when it hits something. When it hits something it should stop running the motors. This behavior can be accomplished by using a Touch Switch mounted to the front of the Sciborg, that sends a signal to the Arduino microcomputer when something is touching the touch switch (aka, when the front of the sciborg containing the Touch Switch has hit something).
//code for using a touch switchconst int buttonPin = 13; // the number of the Arduino pin connected to the switch
int buttonState = 0; // variable for reading the pushbutton status
void setup() {
// initialize the pushbutton pin as an input:
pinMode(buttonPin, INPUT_PULLUP);
Serial.begin(9600);
}
void loop() {
// read the state of the pushbutton value:
buttonState = digitalRead(buttonPin);
// check if the pushbutton is pressed.
if (buttonState == HIGH) {
Serial.println("button is unpressed");
}
else {
Serial.println("button is pressed");
}
delay(10);
}
//when the button is pressed it says the button is pressed.
example of touch sensor working!
• LightSensorNXT
Yet another way to sense the environment is to use a a light sensor. A light sensor sense the amount of light hitting the sensor. Obviously if the sensor is too close to the surface, then the sensor is casting a black shadow that makes reading difficult, and if the sensor is too far from the surface, then outside light blur distinctions between a light and dark surface. We found that the most accurate distance for the sensor to be from the surface that it is sensing, was just over half a centimeter away. When it is looking at a dark surface, then little light is being reflected into the light sensor, and the light sensor will have a low reading, and when it is looking at a light surface, then much light is being reflected into the light sensor and the light sensor will have a high reading. The only problem is with reflective dark surfaces, which depending on the angle of light, may absorb light, appearing dark, or reflect light directly into the light sensor, thus appearing light. The range of light values ranges from 0 to 100 for a scaled value with smaller values being darker tones, and it is pretty consistent across consistent color in consistent lighting conditions. I would have been concerned if our sciborg were required to distinguish light and dark surface in different lighting conditions, but thankfully that was not the case. The sensor also has the option to turn on a LED light, however in my experience turning on the LED light did not help in our situation. The strength of the LED light in conjunction with the ambient light tended to wash out the distnction between dark and light surfaces, making dark and light surfaces difficult to distinguish.
//code for light sensor// Include the Bricktronics Light sensor library
#include <BricktronicsLight.h>
// Select the sensor port for the Light sensor (SENSOR_1 through SENSOR_4) below.
// For ports 3 and 4, use the jumpers to connect pins 2-3 and 4-5.
//
#include <Wire.h>
#include <Adafruit_MCP23017.h>
#include <BricktronicsShield.h>
BricktronicsLight ls(BricktronicsShield::SENSOR_2);
void setup()
{
// Be sure to set your serial console to 115200 baud
Serial.begin(115200);
BricktronicsShield::begin();
// Initialize the light sensor connections
ls.begin();
}
void loop()
{
Serial.print("Raw value: ");
Serial.print(ls.value());
Serial.print(" - scaled value: ");
Serial.println(ls.scaledValue());
// Turn on the light sensor's built-in led (optional)
// ls.setFloodlightAlways(true);
delay(100);
}
//
• Ultrasonic_sensor -- LV-MaxSonar-EZ Series:
Yet another option of sensing is to use an ultrasonic sensor, which turns your sciborg into a poor mecatronic model of a bat. ultrasonic sensors emit high frequency sound above human hearing and listen for echos, and the length of time between a sound and its echo in order to determine the sensors distance from a surface. This is really cool because this is the only method we have seen so far to see farther than the immediate surroundings of the sciborg and see into the distance.
However, the resolution of even our high performance sonar range finder pales greatly to the sonar of living animals like bats, dolphins and the ocasional clicking "blind" person. It detects wide flat surfaces really well because wide flat surfaces produce a clear reflection. It doesn't detect smaller and round surfaces like chair or table or human feet.
//code for testing out ultrasonic sensorconst int ultrasonicPin = A0; // declare the input pin for the potentiometer
void setup() {
Serial.begin(9600);
}
void loop() {
int value = analogRead(ultrasonicPin);
Serial.print("Ultrasonic Reading = ");
Serial.println(value);
delay(100);
} //
//code for ultrasonic sensor being used in our sciborg#include <BricktronicsMotor.h>
#include <BricktronicsShield.h>
BricktronicsMotor m1(BricktronicsShield::MOTOR_1);
BricktronicsMotor m2(BricktronicsShield::MOTOR_2);
const int ultrasonicPin = A0; // declare the input pin for the potentiometer
int rpms1 = 220; //speed of motor (range is 0-225)
int rpms2 = 215;
void setup() {
Serial.begin(9600);
BricktronicsShield::begin();
// Initialize the motor connections
m1.begin();
m2.begin();
}
void loop() {
int value = analogRead(ultrasonicPin);
Serial.print("Ultrasonic Reading = ");
Serial.println(value);
if (value > 12){
m1.setFixedDrive(rpms1);
m2.setFixedDrive(rpms2);
}
else{
m1.setFixedDrive(0);
m2.setFixedDrive(0);
delay(10000);
}
delay(100);
} //
Example of our ultrasonic sensor working well to stop the Sciborg as it nears a surface:
Driving straight using Bang Bang control.
Or at least trying to...
In this code, if we see that the sciborg is veering off to one side (through a mismatch of the encoder values for the two wheels) then it will make a gentle turn to correct the the mismatch

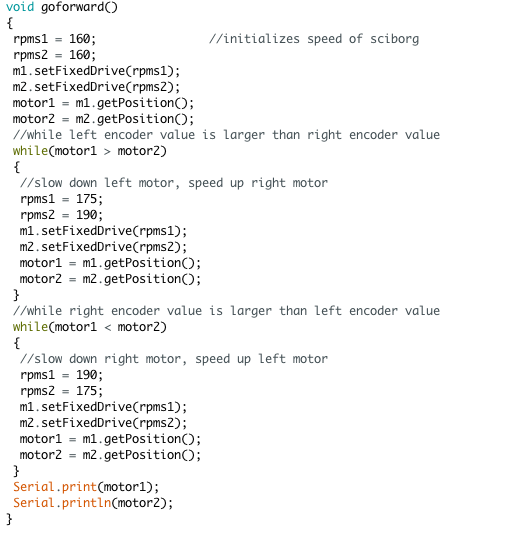
well, it works alright up and down ramps
Following a line:
We tried multiple different search strategies before we got to this one. This method follows the light dark
We used this code and the light sensor to get our sciborg to follow a line on the ground.
// successful bang bang control to follow a path.#include <Encoder.h>
#include <PID_v1.h>
#include <BricktronicsMotor.h>
// Select the motor port (MOTOR_1 or MOTOR_2) in the constructor below.
//
#include <Wire.h>
#include <Adafruit_MCP23017.h>
#include <BricktronicsShield.h>
#include <BricktronicsLight.h>
BricktronicsMotor m1(BricktronicsShield::MOTOR_1);
BricktronicsMotor m2(BricktronicsShield::MOTOR_2);
BricktronicsLight ls(BricktronicsShield::SENSOR_2);
unsigned long previousMillis = 0; // will store last time motor reversed direction
int rpms1 = 255; //speed of motor (range is 0-225)
int rpms2 = 255;
int32_t motor1;
int32_t motor2;
void setup() {
// Be sure to set your serial console to 115200 baud
Serial.begin(115200);
BricktronicsShield::begin();
// Initialize the motor connections
m1.begin();
m2.begin();
// Initialize the light sensor connections
ls.begin();
}
void goforward()
{
rpms1 = 160;
rpms2 = 160;
m1.setFixedDrive(rpms1);
m2.setFixedDrive(rpms2);
}
// pivots left
void left()
{
rpms1 = 0;
rpms2 = 140;
m1.setFixedDrive(rpms1);
m2.setFixedDrive(rpms2);
delay(2);
}
void right()
{
rpms1 = 140;
rpms2 = 0;
m1.setFixedDrive(rpms1);
m2.setFixedDrive(rpms2);
delay(2);
}
void loop() {
// put your main code here, to run repeatedly:
// if see white underneath then continue
if(ls.scaledValue() > 95) {
goforward();
}
// if don't see white underneath
else if (ls.scaledValue() > 80) {
right();
}
// if it is dark underneath
else {
left();
}
No comments:
Post a Comment