Wednesday, June 1, 2016

Arduino part 2

This blog posting continues the earlier blog posting that introduced Arduino.  
For some reason, I actually bothered take screen shots of my code, which means, the syntax is highlighted and will look nice, unlike my other blog postings, where I just copy past the code within a <code> </code> tags 

In this session, we tried to change use the potentiometer to change the blink speed.
We have the wait time as a factor of the potentiometer value.  


We also tried to us light readings from a light encoder.  depending on how light the light sensor registered, we had it light up different LEDs. 
This is the setup:
This is the result of my code


We also tried to use a small switch to turn the LED on and off. 

This is the code.  We used a boolean value to register whether the button has been pressed or not and based on that, value it determines if the light is on or not.
setup:

demo:


this is the sweep code that I downloaded form the Arduino examples. As you can see, the code makes the servo go back and forth between a position of -180 to a position of +180 degrees. 


Now if we wanted to change our code so that the servo only goes betwene 60 and 120 degrees, then one way that we did it was by mapping the range of values that can be outputted through the potentiometer readings to be between 60 and 120.   This is a short way through the code of limiting the scope of radial movement for the servo.  This mapping of potentiometer to output, I took from the earlier introduction to Arduino. 

Setup:
Here is a cool video of using the potentiometer to determine the angle of the servo.


Tuesday, May 31, 2016

Matlab Part 3


Part 1
measuring warming

%%

part 2
%%

Part 3

%%

Part 4 proportinal and bang bang control 

% Bang Bang control 
% define setpower
% define temperature read_temp

clf
delete(instrfindall) % find and delete old serial port objects
s= serial('/dev/tty.usbserial-A700eYqg') % % for USB-serial connection
set(s,'BaudRate',19200)
fopen(s)
npts = 300
y=[];
tic
setpower(s,100)

hold on
axis ([0 npts 200 500])

for i=1:npts
    y=[y readtemp(s)];

    if readtemp(s) < 340
        setpower(s,100)
    else readtemp(s) >= 350
        setpower(s,0)
    end

    plot(y)
    pause(1);
end
toc
setpower(s,0)
%

% proportional heating
% define setpower
% define temperature read_temp

clf
delete(instrfindall) % find and delete old serial port objects
s= serial('/dev/tty.usbserial-A700eYqg') % % for USB-serial connection
set(s,'BaudRate',19200)
fopen(s)
npts = 300
y=[];
tic
setpower(s,100)
k = .05; 
target = 340;
hold on
axis ([0 npts 200 500])

for i=1:npts
    y=[y readtemp(s)];
    present = readtemp(s)

    error = target - present 
    setpower(s,k*(error));

    plot(y);
    pause(1);
end
toc
setpower(s,0)
%


Arduino Day 1

This week was all about learning about Arduinos.
An Arduino is basically a small computer.  It can take input about the outside world, do calculations and send out put signals.  The Arduino uses its own Arduino language.  The Arduino language is very similar to C, but is more abstracted with slightly modified rules that pertain to the Arduino language.  Still, if I were trying to seriously introduce someone to programming, I would definitely not recommend starting with the Arduino programming language by themselves.

In addition to the Arduino Micro controller, We also used a breadboard.
What is a bread board?
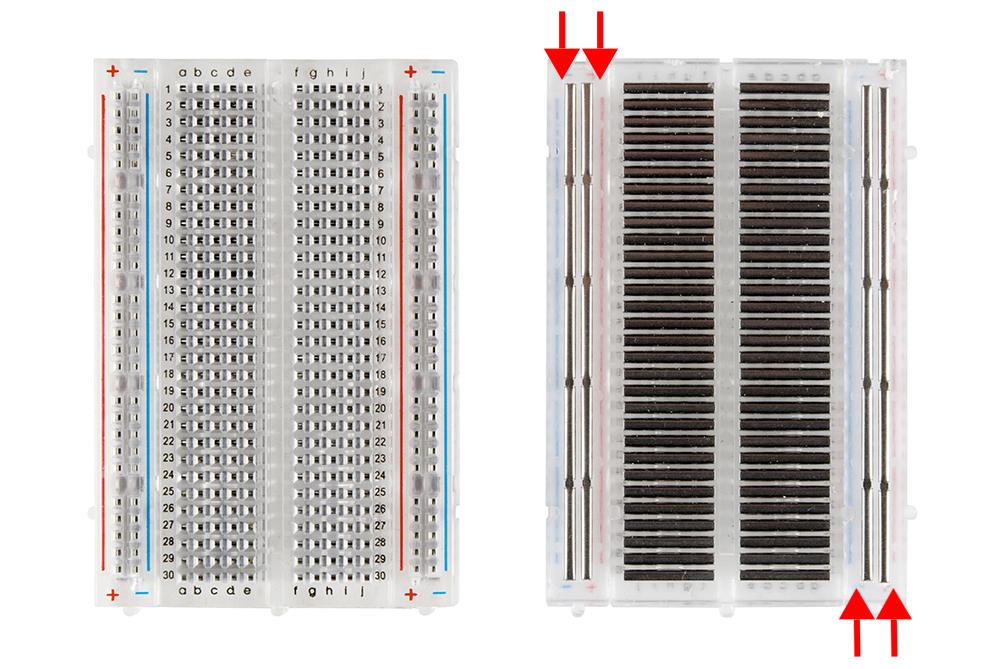
This is a breadboard.
A breadboard is an easy way to make connections between two wires without the need for soldering, tape, alligator clips or any other way to connect wires together.  All of the connection points on the side in the + or - column are connected to  in a column, and each of the rows are connected, as youc an see in the right part of the diagram.  a breadboard makes making wire connections much more convenient and reversible.
It is the B&B (bread and butter) of the casual EE(Electrical engineer).

The first task:
The firs task was to figure out why and how this piece of code works 
Blink with delay of 10 – explain why the LED is on continuously

Code:
// // the setup function runs once when you press reset or power the board
void setup() {
  // initialize digital pin 13 as an output.
  pinMode(13, OUTPUT);
}

// the loop function runs over and over again forever
void loop() {
// visible blinking
//  digitalWrite(13, HIGH);   // turn the LED on (HIGH is the voltage level)
//  delay(1000);              // wait for a second, 
//  digitalWrite(13, LOW);    // turn the LED off by making the voltage LOW
//  delay(1000);              // wait for a second
// fast blinking
//  digitalWrite(13, HIGH);   // turn the LED on (HIGH is the voltage level)
//  delay(500);              // wait for half second
//  digitalWrite(13, LOW);    // turn the LED off by making the voltage LOW
//  delay(500);              // wait for half a second
// blinking so fast you can't see it
  digitalWrite(13, HIGH);   // turn the LED on (HIGH is the voltage level)
  delay(10);              // wait for a 10 milliseconds
  digitalWrite(13, LOW);    // turn the LED off by making the voltage LOW
  delay(10);              // wait for 10 milliseconds
}

the LED flashes every 10 milliseconds, but this is so fast that our eyes perceive it as a continuous light.

the second task was to produce a pattern with (at least) 3 LEDs of different colors using the delay() function

// the setup function runs once when you press reset or power the board
void setup() {
  // initialize digital pin 13 as an output.
  pinMode(13, OUTPUT);
  pinMode(12, OUTPUT);
  pinMode(11, OUTPUT);
}

// the loop function runs over and over again forever
void loop() {
  digitalWrite(13, HIGH);   // turn the LED on (HIGH is the voltage level)
  delay(500);              // wait for a second
  digitalWrite(13, LOW);    // turn the LED off by making the voltage LOW
  delay(500);              // wait for a second
  digitalWrite(12, HIGH);   // turn the LED on (HIGH is the voltage level)
  delay(500);              // wait for a second
  digitalWrite(12, LOW);    // turn the LED off by making the voltage LOW
  delay(500);              // wait for a second
  digitalWrite(11, HIGH);   // turn the LED on (HIGH is the voltage level)
  delay(50);              // wait for a second
  digitalWrite(11, LOW);    // turn the LED off by making the voltage LOW
  delay(50);              // wait for a second
}

– the third task was to use a potentiometer to change the blink speed of the LED behavior proportional to the resistance measured by the potentiometer:
This is the setup:


This is the code
//const int Pin_Pot = A0;  // I have a fixed integer named Pin_Pot whose assigned value is A0
const int Pin_LED = 13; // fixed integer value that select output pin aka select LED
int Pot_Value;  // I have an integer named Pot_Value


void setup() {
  // put your setup code here, to run once:
  // pin mode configures the specified pin, Pin_LED to be input or output (in our case, output)
  pinMode(Pin_LED, OUTPUT);    // sets up Pin_LED as an output
}

void loop() {
  // put your main code here, to run repeatedly:
  // analogRead reads the voltage from the specified pin (Pin_Pot) as an integer from
  // 0 to 1023 which is saved as an interger in Pot_value
  Pot_Value = analogRead(Pin_Pot);  // set wait time from the output of the potentiometer which went into Pin_Pot  
  
  digitalWrite(Pin_LED, HIGH);   // LED is on 
  delay(Pot_Value);               // wait the wait time, which is Pot_Value
  digitalWrite(Pin_LED, LOW);   // LED is off
  delay(Pot_Value);             // wait the wait time, which is Pot_Value
  
}
//


the fourth task was to create a pattern with (at least) 3 LEDs of different colors that does not use the delay() function
this is the code
//const int Pin_Pot = A0; // I have a fixed integer named Pin_Pot whose assigned value is A0
const int Pin_LED2 = 12; // fixed integer value that select output pin aka select LED
const int Pin_LED1 = 11;
const int Pin_LED3 = 13;
long lastTime = 0; // Sets lastTime to 0
int led_Value = HIGH; // Sets led_Value to HIGH
int Pot_Value; // We have an integer named Pot_Value
void setup() {
  // put your setup code here, to run once:
  pinMode(Pin_LED1, OUTPUT); // sets up Pin_LED1 as an output
  pinMode(Pin_LED2, OUTPUT); // sets up Pin_LED2 as an output
  pinMode(Pin_LED3, OUTPUT); // sets up Pin_LED3 as an output
}

void loop() {
  // put your main code here, to run repeatedly:
  Pot_Value = analogRead(Pin_Pot);   //set wait time from the output of the potentiometer

  if(millis() > lastTime + Pot_Value){  
    //if number of milliseconds is greater than number of milliseconds of the last loop through plus the
    // Pot_Value, continue 
    if(led_Value == HIGH){  // if Led_Value is HIGH
      led_Value = LOW;      // then set Led Value to be LOW
    }
  else{   // if led_Value is LOW 
    led_Value = HIGH;     // then set Led_Value to be HIGH
    }
  lastTime = millis();  // sets lastTime to be number of Milliseconds since beginning of program.

    digitalWrite(Pin_LED1, led_Value);    // turn the Led that is Pin_LED to whatever value led_Value is.
    digitalWrite(Pin_LED2, led_Value);    // turn the Led that is Pin_LED to whatever value led_Value is.
    digitalWrite(Pin_LED3, led_Value);    // turn the Led that is Pin_LED to whatever value led_Value is.
  
  }
}
//
This is a picture of the final set up that was capable of doing all of these things.


Monday, May 30, 2016

Lego Racer

This week we stared exploring mechanisms, and in particular exploring drive trains and the speed torque trade off using Legos, to build a cart that would win a race to carry a 1 kg weigh as fast as possible on a 4 meter course on carpet
a written and visual summary and reflection of your design process.
We were given these  building materials:
o Pico cricket & cable (to power the motor)
o Motor board & cable (to control the motor)
o Motor (the old grey motor style, without internal gearing)
o Gears (40-tooth, 24- tooth, 16-tooth, and 8-tooth)
o Wheels: (3 different pairs, one pair of large hubbed with thin tracks, one medium pair with thick grabby tracks, and one small pair with smooth )
o Lego parts: apart from gears and wheels, for vehicle construction.
o 1.0 kg weight

We knew that because the old grey motor did not have internal gearing, that it had a lot of speed but not a lot of torque.
Torque is a measure of the ability to cause an object to spin. Speed is angular speed.
Speed and torque are inversely related to each other.  In fact power = torque*angular velocity , where angular velocity is the angular speed but with a direction.
Rotating large gear using a small gear lowers the speed of rotation by a factor equal to the ratio of the number of teeth on the small gear over the the number of teeth on the large gear, but increases the torque by a factor equal to the number of teeth on the large gear over the the number of teeth in the small gear.
Because the old grey motor did not have the sufficient torque to carry a the cart with the 1 kg weight without stalling form lack of torque, we wanted to create a drive train that would increase the torque.  However, since increasing torque would come at the expense of decreasing speed, we wanted just enough torque for the cart to travel without stalling, so that we would still have the highest speed to win the race. We also knew that the lighter the cart was, the less torque was needed to move the wheel to move the cart, and the faster we could go.

Thus the main thing was to determine the correct gear reduction.  A technique that we thought of was to after buiding a gear train, we placed the 1kg weight on the last gear and see if that weight stalled the gear train.  But the professor suggested that we build the full car and test the drive train driving the whole car which would test for the weight of the car, the weight as well as the significant resistive  force of friction of the heels trying to move on carpeted floors.

Our first try at a drive train had a gear reduction of 1:30.

Since we were told to test it out in real life, with wheels and weight and everything, we had to decide what what type of wheel to use.  As mentioned earlier there were three sets of wheels, we found that the smallest wheel had treads that tended to slip with regard to the axle, which meant that sometimes, although the axel spun, the treads did not spin with it and the spinning axle just spun in place without carrying the car along.  We knew that we should not use this set of wheel for the driving set of wheels.   We thought that if we used the big wheel, that because of the larger radius that we would have a bigger velocity with the same amount of angular velocity.  However, we noticed that the biggest wheel is rather heavy and we thought that would make it so that it has a bigger moment of inertia, requiring greater torque to move, and would increase the weight of the car.  Later on we also saw that the large size of the wheel interfered with our attempts at gear trains.  Thus we settled on using the medium wheel as a the driving wheel that would be attached directly to the drive train.

We tried all sorts of combinations, and we found that using the combination of two small and one middle sized wheel(attached to the gear train) was the fastest combination of wheels. with the worse combination being two middle and one small.


When we tried the first iteration, because the motor would not connect to the first gear of the drive train very well, we used a chain to connect the motor to the drive train.  First of all, the chain connection wasn't very tight, and I found out through later redesigns of the drive train, that it was causing a lot of internal friction in the drive train that reduced the power, reducing both the torque and the speed.
This image shows the drive chain in the fully built cart with small wheels.

Since the cart was going moving well, but rather slowly we tried to reduce the gear ratio to give it a little more speed, since the torque was obviously sufficient.

so we tried a different gear train:
As you cans see, we do not have a chain, which decreases the friction in the drive train.  Additionally we decreased the gear ratio and the number of gears used, which also reduces friction.
Whereas our first iteration had a gear ratio of 1:30, this itieration's gear ratio was 1:25.
Consequently it runs much faster.  The fastest that this iteration runs the track was about 12 seconds, compared to 17 seconds for the first iteration.
This is a picture of how everything fits together.

We tried to see if we could lower the torque yet further to increase the speed.  I tried a 1:15 gear ratio, but that produced a torque so small that the cart often stalled and didn't move.
During Xixi's office hours, my partner Jiaming came up with a revolutionary redesign of the drive train that used more Legos to utilize a 40 wheeled gears at a level above the chassis to produced a diver train with a gear reduction of 1:16.67 which was barely enough to move the car while theoretically producing the most speed.


This shows the elevated motor that enables the motor to directly drive a 40 tooth gear.
 Despite the drastic change in gear reduction from 1:25 to 1:16.67, the third iteration of the cart didn't actually go much faster than the previous iteration.  The new iteration takes about 11.25 seconds, as opposed to the 11.7 seconds of our previous reduction.  We think that this may be because the third iteration required more gears and more legos to construct than the second iteration which may have negated the additional gains we might have expected from the change in gear ratios.

Other notes: It was remarkable how flexible the lego designs were building drive trains.  the 8, 24 and 40 tooth could be used all in one plane with the regular holes provided.  the 16 tooth could not be used in the same plane with the regular provided holes in the lego bricks, bit it could be used to transfer to a different plane of lego bricks.  Getting the right gear reduction with the right alignments was difficult, but I imagine it could have been a lot harder.

Therefore we ended up creating two iterations that were about the same speed as each other.  


When we raced our little carts, I was fascinated that the winning cart was built essentially upside down from all of the other carts, with the lego nobs facing downwards rather than upwards, which allowed the cart to use a particularly unique drive train, that would have been impossible in the normal direction. Sometimes, all it take is a simple paradigm shift that lego knobs can face down as well as up to come up with the optimal design.

Sunday, May 29, 2016

final review

Project description
When my partner and I set out on our project we aimed to help the child studies center keep track of which toys were available in their crowded closet.  Their current system has a list of all of toys that were in each shelf of the closet.  This cuts down search time if a person decides to search in the closet, but it does not indicate whether a closet search was even going to be fruitful.  

Our project has two parts, an array of toggles to indicate, mechanically, whether a toy is available or not, and a led strip that lights up when the toy cabinet door was open so that they remember to use the toggle array, because the toggle array is useful only when people actually use it. 


some highlights of our project:
I designed and constructed a fully functional sample toggle
when I tested and modified the toggle 

and when I successfully designed and constructed the whole toggle array.  


When Nanaki constructed a working LED light array,

when she lit up the LED light strip 

and when we integrated the pieces. 


Impressions and Improvements:
If I were to improve on this more, I would increase the margins of the piece, so that there was more material between the outside joints and the edge of the whole array for the front and consequently the back.  I think that would cut down on the chipping.
If I were serious about producing this I would seriously consider building and constructing the whole thing out of something that isn't delrin, acetal.  As my professor pointed out,   Delrin, or acetal, is very expensive.
I would also look into if I could further decrease the size of each window unit so that I can fit more windows into the array.   
I would also like to investigate the light strip, and create some cool patterns on the light strip, like demonstrated in some online videos.   I know it's possible, but I haven't seen Nanaki do it, so I would like to see if I can get it to work using the Matlab code. 


Thursday, May 12, 2016

Final Project part 5

So, having come up with a good sample toggle that I was satisfied with, I set out on creating the whole array.

I copied the pieces that needed to be changed (front and back and spacers) into their own files.
For the front and back pieces, I wanted to the same pattern on a 2x6 grid and so what I did was that I copied and pasted 6 on one side and then I mirrored the patterns on to the other side.
When you mirror it is helpful to create an infinite line for construction.
What I learned is that when you select elements with a selection box, if the entire element is not int the selection  box then it is not selected, and when you go to mirror or copy it, it will not be mirrored or pasted.  curiously enough this applies to dimensions as well, so if you don't select dimensions, the dimensions won't be copied over and the dimensions can be accidentally changed.   So as a reminder. make sure every element that you want copied, including dimensions are all selected in your copy-paste or mirror stage.   I understand there is a more elegant way of copying a pattern on a grid, but I didn't figure it out and so instead I just used copy paste. and it seemed to work decently well enough,  one just has to be careful.
This is the back:

This is the front piece with all of the windows
as you can see, I didn't copy past very carefully and had to redefine the distance from the edge to the center joint for each window pane.  

this is the spacer.  its just been mirrored from the last version.

although the toggles haven't changed, I've included a picture anyways, just for reference.


Then I got the laser cutter to cut the pieces out.
Unfortunately many of my pieces turned out very poorly.  the Delrin warped significantly under the heat and the lines were double cut so that some weren't even cut out.
Actually, the back board and all of my 12 toggle pieces were all salvageable and I didn't need to re cut them.  The holes in the back board, due to being double cut were too big in the x dimension due to being double cut in the x dimensions, but I could fall back on the accurately cut x direction to hold the joints tightly.  As for the toggles, even thought the holes weren't cut all the way through, I was able to use the drip press and a piece of meta to press out the holes.  The resulting holes weren't very pretty(they looked like they had been shot), but they remained mostly serviceable.  apart from a couple of holes where the double cutting had made the holes so large that the weren't even

I ran out of 1/8 in Delrin, and had to use something that was slightly thinner. It wasn't labeled with its thickness but if I were to guess from the imperial system. I would guess 3/32.
it looked to be a different material as well, because it was much whiter, and didn't have as shiny a flat surface.  When it was being cut with the laser, the cut etch was a lot shinier and glossier than the normal delrin, didn't bend as much fr om the heat and only took one pass through to be completely cut.  all in all it was a much nicer material for the laser printer.   I also got the impression that it was easier to chip than the other material.  
 However, it as thinner than what I had planned, and while the 1/8th delrin cut in my original dimensions may  not have broken, the thinner piece that I actually ended up using did chip.  I'm also not sure if it was because the material was different formulation of delrin.  when I hammered it into place, i really ought to have started with the center ones and then moved out to the joints towards the edge.  instead what happened was I started with the joints on the edge and after tightly fitting some joints that made fitting the remaining joints more difficult and resulted in some unnecessary breaks and chips.  I could have also done something like what you are supposed to do on car wheel screws, where you never commit to just one nut all the way but incrementally tighten all joints.  I also dropped my array several times on the hard ground, which is also not something that I would recommend doing to a acetal piece.  I guess if I was really serious about it I could have gotten a clamp, because I know what level of clutzy-ness I am capable of.
Everything had to and fitted very tightly and precisely.  This annoyed me, but also presented sum unforeseen benefits.  the annoying part was that I had a smaller acceptable margin of error for laser cut errors like double cutting or excess heating.  It also meant that assembly was tricky, as everything had to light up and match up correctly.  In the end, I created something that wouldn't be very easy to pry apart, which is a positive feature.
I failed to take any pictures, so I guess you'll have to believe me when I say that each of the 1/8th pieces of delrin was significantly warped and curved before final assembly.  However, after I assembled, everything was held very tightly and rigidly and all of the warping disappeared as the friction in the joints and the rigidity of the pieces served to make the entire pieces almost as straight as the ideal shape that I had in my Solidworks construction

This image was taken before I tapped together all of the joints.  It shows that rather than using red and green markers, I used colored sticky notes, which are less likely to rub off than the markers.

The sticky notes were cut just wide enough so that no matter which state the toggles were the back of the dowel rods would never travel past the edge of the sticky note and so it could never lift off the sticky note from the edge.
This image shows before the front was pounded into the spacers and connected with everything else.
The small hammer was super useful and I feel like there should be another small hammer around just in case the small one gets broken or lots because the small hammer is a wonder.
This is the completed array once it's been hammered together.
The dowels don't stick out too much and the overall thickness isn't that thick either, and in this image you can see that the top plate is much thinner than the bottom plate.

If I  were to continue on this path, I would consider increasing the margins of the piece, so that there was more material between the outside joints and the edge of the whole array for the front and consequently the back.  I think that would cut down on the chipping.
If I were serious about producing this I would seriously consider building and constructing the whole thing out of something that isn't delrin, acetal.  As my professor pointed out,   Delrin, or acetal, is very expensive.

Here is a picture of my toggle array from the back.

I  also helped my partner with her part of the project.  I suggested that she change her program so that rather than making the lights go off when the light level gets to be a certain medium light level, a tricky thing to master, that the lights should go off based on a change in state from dark to light.
I helped her understand what types were and what a boolean type is and how to initialize and use boolean.  The islight variable should be set to false anytime the lightness reading is less than a certain constant and the islight variable should be set to true anytime the lightness reading is greater than that certain constant.  one should have a global value to remember one's past light state, and each time through the program loop, if the current reading is light but the previous reading was dark, then this signals a change in light state representing an opening closet, and then the light show should begin.  I also helped her debug her script.  She had tried to assign strings to a variable of type integer, and she had tried matching a string to a variable rather than another string (the difference being that strings are surrounded by quotation marks-  light is a variable, "light" is a string constant that you can compare against. )

Later on, when her wires weren't working, I helped her understand that her wires were backwards.  she had the idea that since ground was where electricity flowed into and electrons flowed from the negative terminal, that the ground should be attached to the positive line.  However, as we know from physics, thanks to Benjamin Franklin, current(electricity) actually flows from positive terminal to negative terminal even though electrons flow in the opposite direction, from negative to positive.

I introduced my partner to wire strippers and alligator clips.  We used wire strippers, because there wasn't enough exposed metal to comfortably connect two wires together.  She had some trouble sliding the plastic casing off of the metal wire after cutting the plastic casing.   She tried bending back and forth, which one shouldn't do because it risks the structural integrity of the metal wire(as in you can break the wire, like you do with a paperclip bent back and forth too many times).   Then she gripped the wire strippers too tightly as she tried to slide the plastic casing off the interior metal wire.  the extra friction made it difficult to slip off the plastic casing, and it also cut part of the metal wire inside.

I also helped her understand that the code that she downloaded from the internet was not for the led strip that she was using, as the led strip that she was using only had one input, but the code assumed three inputs for the three colors, red, green and blue.   She had two pins in the arduino connected to the led strip, one that was connected to the input line, and the second that was connected to one of the ground lines.  This did not work.

I also pointed out that she needed to have capacitors, otherwise she was creating a short circuit that may or may not have blown out some bulbs.

The led strip apparently requires 12volt battery, however I also learned that when you connect batteries in series(pos to neg) then you increase the voltage(measured in Volts(V)), but when you connect batteris in parallel(pos to pos, then neg to neg) then you increase the capacity(measured in Amperage hours (Ah))   This article is really informative

Thursday, April 28, 2016

Final project part 4

Testing the press fit.

On Monday, I tried to use a thermal press to test creating a connection of melted Delrin.  However, a side effect of that is that then there are big protrusions.  This would mean that slide array would be full of knobs, not flush and much thicker than it could be if I had decided to use press fits.
I think that the thickness of the array is important.  Not only would it save material, but also, since it is going to be installed on the inside of a packed cabinet, the less space it takes up, the more convenient it is.

Therefore I decided to use press fit.

I also tested my piece by taping it to a cabinet door to test how easy it is to jostle the toggle out of its correct state.  The good news is that the dips for the dowels are actually deep enough that even a sharp closing or opening will not jostle the toggle out of a set state.   However, the state can be accidentally changed through a sleeve catching on the dowels and changing the state of the toggle.
In order to reduce the chance that that happens, the dowels should be shortened so that they don't stick out as much.

nitpicking problems and my modifications to resolve  them 
1) deciding to do press fits means I need to decrease how much the pins stick out past the holes.   
I measured that pretty much on average the pins stick out about 1mm out from the surface of the front and back. Finally, an instance where the 4th way to measure using a caliper, using the caliper head, the way that many people forget to use.   Then, I decreased how much the pins stick out in  my Solid works model by 1 mm. 

1) spacer gives a little too much space. 
using the caliper, I determined that there is a 6.5mm space for a 3.25mm thick toggle to sit in.  
while I do want to leave some space 
I changed the spacer distance from .65 cm to 0.40 cm or a decrease of 0.25cm 
If this turns out to be too tight, then I can increase the spacer distance to .45 cnm 

2) the connection between back front and spaces was pretty good initially, but it loosened up a bit.  it wasn't so loose that I would feel concerned that it might fall apart accidentally, but I feel like it could be better
it is a pretty good press fit, but I feel like it could be better. 
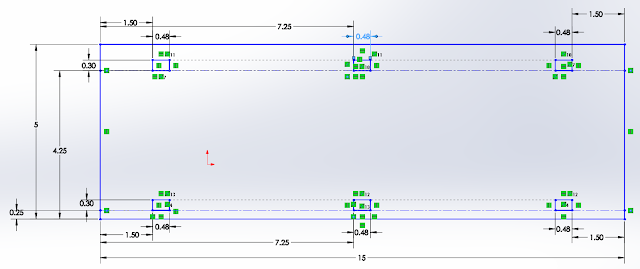
I am putting it 7.25cm from the left.
on the spacer, because the spacer width is 0.4 larger than it was initially, then 
currently the solid works difference between the pin and the hole, or the total allowance (allowance on boths sides) is 0.48cm- 0.7635cm or 0.00375 cm or 0.0375 mm.  after careful examination of the pin hole connection, I figure that I could probably increase the allowance between .3 mm - .4mm.   increasing the current allowance gives something in between 0.3375 - 0.4375mm.  neither those values doesn't divide very nicely by 2 very pretty, and so rather than having an allowance of that I think I will have an total allowance of 0.40mm 
1.50cm = 15.00 mm. thus with a 0.40mm allowance, the pin(on the spacer) should be .4mm or 0.04cm bigger than the hole. 

3) the spacer has a tendency to warp in the up down direction.  
to fix that I am putting in a third connection point in between my two connection points that I had to connect the spacer with the front and back.  in my original design, there are only two connection points for each spacer.  in the new design there are three.   This decreases the length given to the spacer to warp.  this would make the whole structure more rigid. 

4) Given that I was going to put in a third connection point on the spacer, I felt like I could get away with using an even thinner Delrin than a 1/8 in Delrin.  However, after quite a lot of fishing around.  I found that there wasn't enough of the thinner delrin sheets to make my thinner array dream a possibility, and it was unlikely that newly ordered delrin would arrive in time.  Therefore, I stuck with the current thickness of material.  Oh well, at least I know it's very rigid.   

5) I am going to experiment with different length of dowels such that it is still easy to operate but still short enough such that it isn't too easy to bump toggles out of state.

consequently I ended up changing the designs for the front, back and spacers. 


after designing the new pieces, I printed them out and assembled them.  they look very nice. 


on Monday I stayed from 1:30 - 5:30.

The new version is shown above.  It is thinner.  
The new version is on top.  It is thinner, but it still moves pretty well.  (And it also happens to have toggle upside down)
IN this picture I have tried using different paints and markers to color the back to indicate whether a toy is available or not.  In the top I used a oil-based paint.  on the bottom I used permanent marker.  I think the bottom one looks nicer.  However, with both versions, the back of the toggle is scraping off some of the painted color.  I think maybe I will cover up the colored parts with clear tape to protect the paint from being scraped off, just for aesthetics. 


I also tried to heat stake the dowels, but it didn't work very well because it added significant thicknesses to the toggle, and because I am valuing the thickness of the array, I opted for a tight press fit rather than heat staking all of the dowels.